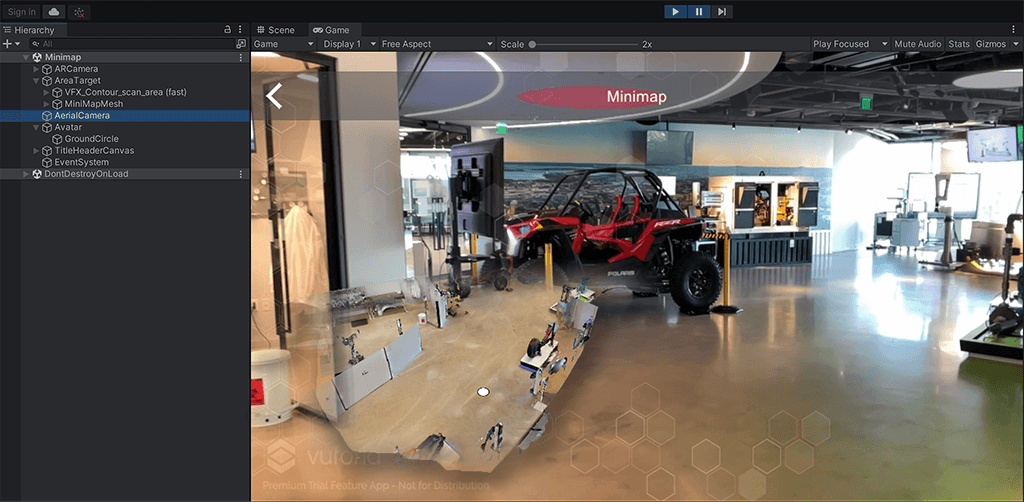
The Vuforia VFX Library includes a mini-map example that uses the Area Target to visualize the user’s position. Get started and set up your own minimap to aid your users in navigating large spaces.
You can add effects and helpful UI to your Area Target tracking AR experiences by using the VFX library available in the Unity Asset Store. The sample scenes in the VFX includes several assets to inspire and improve your AR application. See the VFX overview for a full list or continue here to set up a minimap for your Area Target.
Prerequisites
A Unity editor version supported by Vuforia Engine. Please refer to the Supported Versions.
NOTE: The minimap is only supported with Area Targets that are created from meshes. Area Targets from point clouds are not supported.
QuickStart Guide
Download the latest Vuforia Engine SDK and add the VFX library from the Asset Store. Add also your own Area Target with meshes in the .unitypackage provided by the Area Target generator.
- Go to the Minimap scene.
- In the Hierachy, select the Area Target GameObject and replace the database with your own.
- In the Minimap Mesh GameObject, replace the preview model that is a child of the Minimap Mesh with your own preview model prefab.
- The following parameters likely require some adjustments:
- Test it in Recording mode with your own recording inserted in the ReloadSceneWithRecording.cs that is a part of the ARCamera. Or test in Simulator mode with the ReloadSceneWithRecording.cs component removed, and the Play Mode set to Simulator in Vuforia Configuration.
- Depending on your Area Target’s preview model the min Height and max Height that is available in the Minimap Material, should be adjusted to correctly include the floor and cropping of the roof.
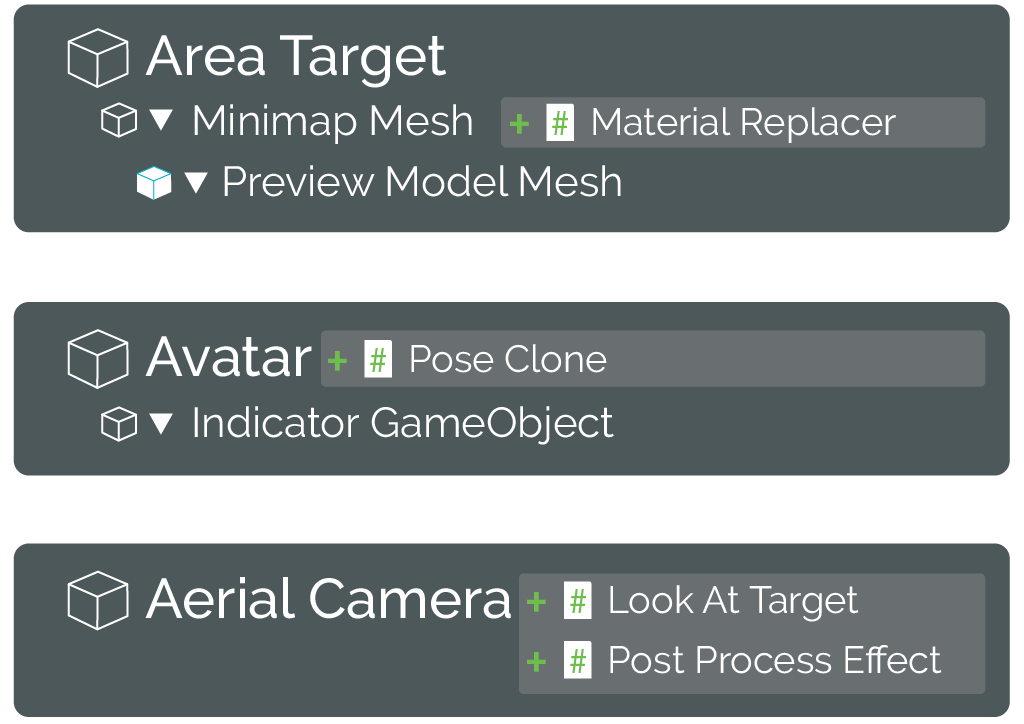
Minimap Overview
The illustration below is an overview of the GameObjects and components required to set up the minimap for an Area Target.
Create a Minimap for your Area Target
In this section, we set up a minimap for an Area Target in an empty Unity project. The minimap is assembled from using a second camera GameObject, an avatar that indicates the user’s position, and a minimap mesh.

Start by adding the latest Vuforia Engine SDK, VFX Library from the Asset Store and your own Area Target with a recording to test with.
ARCamera and Area Target
- Add the ARCamera and an Area Target as GameObjects. Select your Area Target database in the Inspector of the Area Target.
- Configure the ARCamera as described here.
Minimap Mesh
We will use the preview model prefab of the Area Target as our minimap. It is therefore only possible to use models that are meshes. Point cloud models are not supported.
- Create a new empty GameObject and name it Minimap Mesh.
- Locate in the Projects folder your Preview Model prefab and add it as a child to the Minimap Mesh.
- If necessary, align the Minimap Mesh and the preview model with the Area Target so that the Transform positions and rotations are 0,0,0.
- In the Layer dropdown, select AerialView and click Yes, change Children.
- Add the component Material Replacer to the Minimap Mesh and assign the Minimap Material as the Replacement Material.
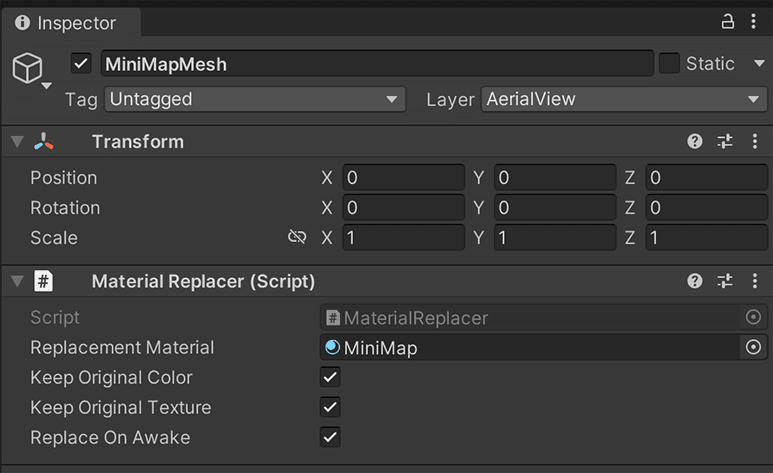
The Minimap Material uses the HeightClip shader to control two clipping planes: Min Height and max Height. Adjusting the two values in the Inspector of the Material lets you crop away any ceiling that obscures the view to the floor. It takes some trial and error to find the correct values that have the floor included and the ceiling excluded.
The other functions Keep Original Color, Keep Original Texture, and Replace on Awake are in cases where you wish to replace the mesh color, texture, and whether to apply such changes to it later on. In addition, you can also replace the MiniMap Material with your one of your own design. Just apply the HeightClip shader to that material to get the properties for cropping. See Using your Own Material for more information
Avatar
We will also use an avatar that updates its position relative to the ARCamera. It will resemble the user’s movement on the minimap. The avatar can hold any content to visualize and indicate the user’s position. We shall use the same circle as in the Minimap sample scene.
empty GameObject and name it Avatar. Reset its transform to 0,0,0. - In the Layer dropdown, select AerialView.
- Add the component script PoseClone.cs and add the ARCamera as the Source.
This script retrieves the ARCamera’s position at runtime and transfers the values to the Avatar, that in result, provides an accurate representation of the user’s movement and orientation. The World Up setting keeps the UP vector of the avatar pose gravity-aligned with the World orientation. It’s recommended to keep this enabled for the minimap.

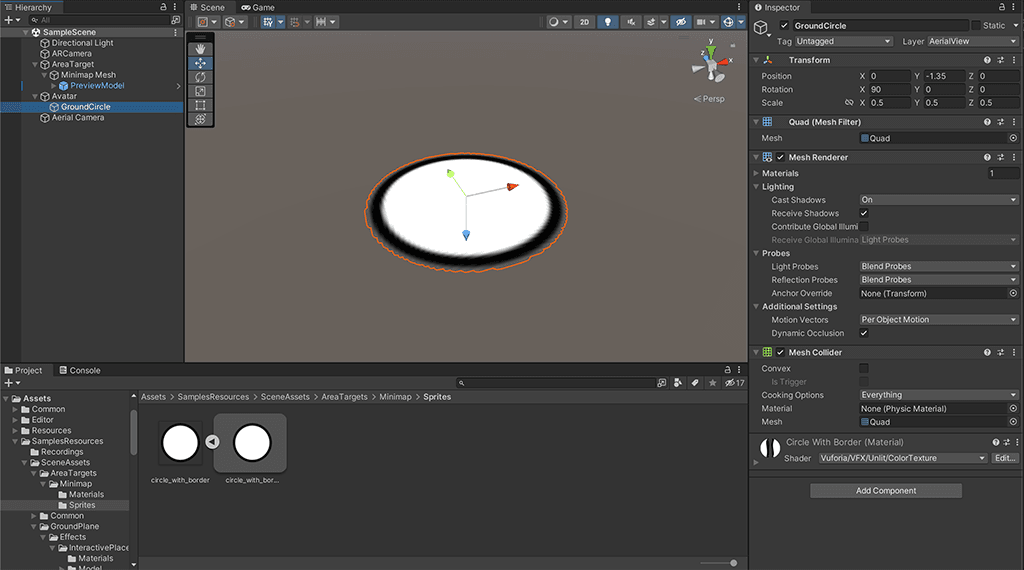
- Add any object you wish to use as a visual to represent the user’s position. In this example we add the GroundCircle from the VFX sample scene: Create a Quad GameObject and assign the Circle_with_border material to it.
- Change its transform to 0, -1.35, 0 and rotation to 90, 0, 0 and scale it down to 0.5 uniformly. We adjust the Y value to offset the GroundCircle from the ARCamera’s floating position. If you have an idea for a floating object as indicator for a user’s position, you can of course adjust the Y value.
AerialCamera
The main component to create our minimap is a second camera with a limited viewport.
- Create a new Camera from GameObject -> Camera. Name it Aerial Camera.
- In the Inspector, disable the Camera component and make the following changes:
- Set Clear Flags to Solid Color.
The Clear Flags tells Unity what to display in empty areas around our minimap.
- Set the Background color to grey, but with the alpha value at 0 (transparent).
- Set the AerialCamera's Culling Mask to only AerialView. Set the ARCamera's CullingMask to exclude the AerialView layer.
- Set the Field of View (FOV) to around 40.
The FOV depicts how close or far the minimap is viewed. A low value is a close-up view. A high value can display the whole minimap.
- Change the Clipping Planes Near value to 0.1
- Change the Viewport Rect X to 0, Y to 0.05, W to 0.5, and H to 0.5. However, we can override these values with the minimap animation.
- Set the Depth to 2. In this way, the minimap camera will be drawn on top of the AR Camera.

- Set Clear Flags to Solid Color.
- Continue to edit the Aerial Camera and add the component Look At Target.
- Add the Avatar from the Hierarchy as the Target.
- Set the Offset to 0, 8, -8.
This script tracks and follows a Target’s Transform with adjustable factors such as Smoothness, and whether rotation of the user should be included. The Offset’s values determine how the minimap is viewed. Our example places the view in an orthographic position, but you can also set the Offset to 0, 10, 0, for a top-down view.

- Add the component Post Process Effect.
This script clears the grey empty areas around the minimap mesh and applies a fade to remove any clear-cuts at the viewport borders. The Vignette Material applies a color overlay on the mesh and a border color with a fade effect. You can change this with your own Material and shader.


- Let’s finalize with adding an event call to the Aerial Camera as soon as the Area Target is detected.
- In the Default Area Target Event Handler of the Area Target, add a new object to the
OnTargetFound(). Add Aerial Camera from the Hierarchy as the object and select in the dropdown Camera – Bool enabled. Check the checkbox.
- In the Default Area Target Event Handler of the Area Target, add a new object to the
The basis for a minimap is now set and can be tested in Recording or Simulator Play Mode. The following steps demonstrates how the minimap can be animated.
Minimap Animation (optional)
With the VFX Library assets, we can add an animation to the Aerial Camera that will initiate from a full screen view and then fly off to the lower left corner of the main view. We do this with the ViewportAnimation.cs.
- Add the Viewport Animation to the Aerial Camera.
The ViewportAnimation.cs script has a set of configurable parameters. For example, the Start Rect and End Rect are values that determine the camera’s viewport start size and end size. In other words, how large your minimap should be from one transition to another.
- We will set the End Rect to half size, so X is 0.05, Y is 0.05, W is 0.5, and H is 0.5.
We set the other parameters to:
- Disable Play on Awake. It controls whether to play the animation automatically; meaning, no specific calls from other places are required.
- Set Delay to 1. The value is in seconds and delays the animation.
- Set Duration to 2. It sets the animation’s play length.
- Disable Loop. It controls whether to loop the animation.
- Set Transition to CUBIC. It can be set to CUBIC or LINEAR mode.
- Enable Start Rect on Awake. It sets the viewport size to Start Rect at animation start. Disabling it will start the minimap with the size that was set in the scene instead.
- In the
OnReachedEnd()event, we will add a new call to the Look At Target in the Aerial Camera object. Select in the dropdown, LookAtTarget – FlyToOffset(string) and set it to 0, 8, -8.
- In the Aerial Camera’s Look At Target component, set the Offset to 0, 0, -1.
- Back in the Area Target’s Default Area Target Event Handler, we add the call to
OnTargetFound()with Aerial Camera as the object and theViewportAnimation.Play()as the function.
Test the animation in the Recording or Simulator Play mode.